Technical assistance
We want to clear the main technical questions that may arise about the operation of our products and the steps necessary for their assembly.
Vertex drawer
Yes, the Lokbox mechanism is used to fasten the bottom of the drawer to the front part without preventing adjustment of it. It is compatible with the Concept, Slim and Vantage-Q drawers or any drawer. It is especially recommended for very wide drawers used in the furnishings of kitchens, bathrooms, lounges and even inside wardrobes. However, you need to take into account that the installation dimensions change. See diagram.

Here we will show you how to assemble a Vertex/Concept drawer with the Tecnotool machine, you will see that it is very simple and fast. Thanks to its measurement positioner and its easy handling you will see that it will be very convenient for you.
Here we will show you how to assemble a Vertex/Concept drawer with the Tecnotool-Pro machine; you will see that it is very simple and very fast thanks to its automatic side stapling system. You will be able to assemble large series of drawers.
The formula is: internal module width -70. For this particular case, the internal width of the module will be 800 - 32 = 768 mm. From this measurement we subtract 70 to get the length to cut the profiles = 666 mm.
Yes, as long as you have a 13 mm wide square railing , or a straight rib with a minimum internal height of 135 mm and width of 13 mm. If I have a 800 mm wide module, and a 16 mm thick side panel.
It is only necessary to connect the machine to air with a pressure of 7-8 kg/cm2
The following video shows how you can easily assemble the Vertex inner drawer.
Yes, for the assembly of the rectangular under sink insert it is necessary to make a 90º angle straight machining cut, although it is recommended to make a machining cut with a radius of 20 mm.
The following video shows how you can easily assemble the Lokbox mechanism.
In order to assemble a kitchen drawer with hinges on the unit doors (hinged doors) it is necessary to use hinges with an opening angle of 165ª or to use spacers, doing so means there will be enough space to pull out the drawer.
The spacer is intended for assembling a drawer inside a unit with a hinged door. It can also be used in cabinet interiors with a sliding door with loss of opening.
This 25 mm thick spacer is compatible with the following interior drawers: Vertex, Concept and Vantage.
Yes, the spacers that are user for assembling kitchen Vertex, Concept and Vantage drawers are the same as hinges on unit doors (hinged doors).
No, the minimum unit depth is the same (depth + 5 mm).
No, the assembly and positioning of the rails is the same in both the push and soft close versions.
It depends on the type of front panel you use for the interior drawer:\- Aluminium front. This is fitted onto guides at the usual distance, 37 mm in the 4th hole of the guide.\- Particle board front. The thickness of this board must be added to the 37 mm of the 4th hole of the guide.In other words, if the front is 19 mm thick, the guide must be fastened at 37 + 19 = 56 mm at the 4th hole of the guide.
Yes, it is the same profile that is used for all four drawer heights. The 178 mm height panel, however, also needs the front rail profile.
The RAL code of the anthracite grey finish of the sides of the Vertex drawer is approximately 7043. The RAL code of the grey finish of the sides of the Vertex drawer is approximately 7045. The RAL code of the white finish of the sides of the Vertex drawer is approximately 9003.
Yes, for example, if we want to assemble a drawer for a module width of 500 mm, we have to use the existing code for the 600 mm module and cut the base and rear panels to the width indicated by the formula. Width of module interior - 19 mm.
The following video shows how you can easily assemble the Vertex runners.
The following video shows how you can easily to disassemble the Vertex drawer.
The following video shows how you can easily to adjust the Vertex drawer.
The following video shows how you can easily assemble the Vertex drawer.
Concept drawer
The RAL code of the anthracite grey finish of the sides of the Concept drawer is approximately 7043. The RAL code of the white finish of the sides of the Concept drawer is approximately 9003.
Concept 30 kg exterior drawer height 105 mm
Concept 30 kg exterior drawer height 185 mm
Concept 30 kg exterior drawer height 138 mm
Concept 50 kg exterior drawer height 138 mm
Concept metal sides height 105 mm RIGHT
Concept metal sides height 105 mm LEFT
Concept metal sides height 138 mm RIGHT
Concept metal sides height 138 mm LEFT
The formula is: internal module width -70. For this particular case, the internal width of the module will be 800 - 32 = 768 mm. From this measurement we subtract 70 to get the length to cut the profiles = 666 mm.
Yes, as long as you have a 13 mm wide square railing , or a straight rib with a minimum internal height of 135 mm and width of 13 mm. If I have a 800 mm wide module, and a 16 mm thick side panel.
It is only necessary to connect the machine to air with a pressure of 7-8 kg/cm2
In order to assemble a kitchen drawer with hinges on the unit doors (hinged doors) it is necessary to use hinges with an opening angle of 165ª or to use spacers, doing so means there will be enough space to pull out the drawer.
In order to assemble the aluminium back on the Concept drawer it is necessary beforehand to mount the accessories corresponding to each side height onto the profile. Subsequently, we will fasten the profile to the sides of the drawer.
Due to the fact there is separate assembly on the drawer, you can mount the Concept rails on other models of drawers. However, it is not advisable, as each drawer has its own rails and its own machining distances.
The board cutting dimension and the position of the hook on the front are different. However, the hole pattern of the guide rail is the same for the Concept, Vantage-Q and Slim drawers.
The RAL code of the anthracite grey finish of the sides of the Concept kitchen, household and bathroom drawer is approximately 7043.The RAL code of the white finish of the sides of the Concept kitchen, household and bathroom drawer is approximately 9003. Although it is necessary to bear in mind that the white silk colour of said drawer is metallized and the RAL codes are for flat colours.
It is only necessary to connect the machine to air with a pressure of 7-8 kg/cm2.
Yes, the drawer measurements, including its dimensions and machining, are fully compatible. The board cutting measurements, mounting dimensions and placement of the drawer in the module are exactly the same.This allows customers to mount 30 kg Concept slides and 50 kg slides on the same drawer.
The following video shows how you can easily assemble the Concept drawer.
The following video shows how you can easily assemble the Concept drawer with back panel.
The following video shows how you can easily assemble the Concept inner drawer.
The following video shows how you can easily assemble the Concept drawer.
No, it has a different profile and plastic accessories, because the height of the ribs is different from those of the Concept drawer.The front rail used for the interior drawer height of H178 mm is the same as that used in the H185 mm Concept drawer.
Yes, board size are the same for both drawers only the height of the back board changes in the 93mm-high version.
Vantage-Q Drawer
The following video shows how you can easily assemble the Vantage-Q drawer.
The following video shows how you can easily assemble the Vantage-Q drawer.
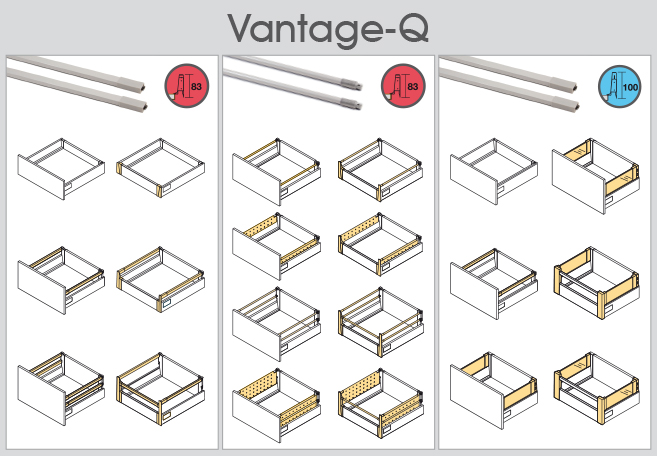
We have different heights of sides and accessories that make it possible to create different types of drawers.You can design inner and exterior drawers, with a large capacity for saucepans, with rounded or square rails, with inside accessories and even glass sides.

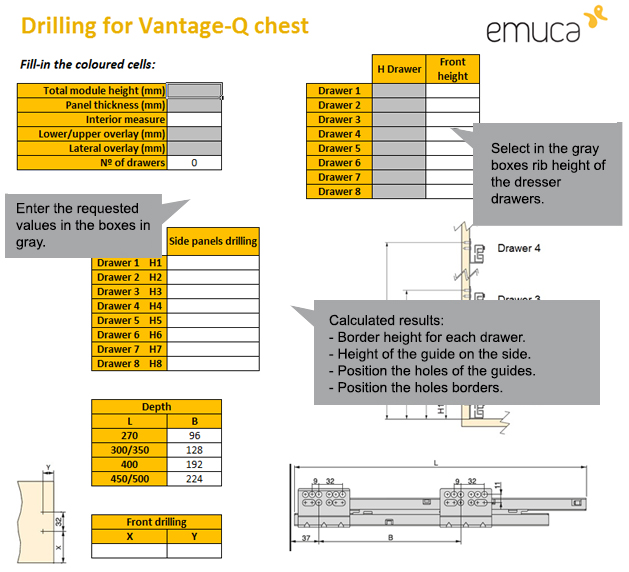
In order to plan the design of a kitchen drawer unit with Vantage-Q drawers, we need to bear in mind several parameters, this work is made easier with a help table to configure those units.This calculation table makes it possible to calculate the position of the guides, depending on the dimensions of the unit and the number of drawers.Also, it makes it possible to choose different heights of drawer, consequently it calculates the height of the façade of each of them within the same unit.

Documents:
DownloadIn order to plan the design of a kitchen drawer unit with Vantage-Q drawers, we need to bear in mind several parameters, this work is made easier with a help table to configure those units.This calculation table makes it possible to calculate the position of the guides, depending on the dimensions of the unit and the number of drawers.Also, it makes it possible to choose different heights of drawer, consequently it calculates the height of the façade of each of them within the same unit.

Documents:
DownloadThe RAL code of the white finish of the sides of the Vantage-Q kitchen drawer is approximately 9003.The RAL code of the grey finish of the sides of the Vantage-Q kitchen drawer is approximately 9006.
It is recommended to mount the guide rail synchroniser with push for the Vantage-Q drawer on units with a width of maximum than 1,200 mm.
It is recommended to mount the guide rail synchroniser with push for the Vantage-Q drawer on units with a width of more than 600 mm.
The minimum unit depth required to install a Vantage-Q interior drawer with push is calculated with the formula: Min. depth = Depth + 44 mm. In this case the minimum unit depth needed will be 500 + 44 = 544 mm.
The minimum unit depth required to install a Vantage-Q exterior drawer with push is calculated with the formula: Minimum depth = Depth + 38 mm. In this case the minimum unit depth needed will be 500 + 38 = 538 mm.
Yes, the bottom and the back of the Vantage-Q drawer have the same measurements for both the soft closing runners and the push runners.
The following video shows how you can easily assemble the Vantage-Q drawer.
No, each drawer has a synchroniser accessory.
In order to assemble a kitchen drawer with hinges on the unit doors (hinged doors) it is necessary to use hinges with an opening angle of 165ª or to use spacers, doing so means there will be enough space to pull out the drawer.
Slim drawer
It is recommended to mount the guide rail synchroniser with push for the Slim drawer on units with a width of maximum than 1,200 mm.
It is recommended to mount the guide rail synchroniser with push for the Slim drawer on units with a width of more than 600 mm.
The minimum unit depth required to install a Slim interior drawer with push is calculated with the formula: Min. depth = Depth + 12 mm. In this case the minimum unit depth needed will be 500 + 12 = 512 mm.
The minimum unit depth required to install a Slim exterior drawer with push is calculated with the formula: Minimum depth = Depth + 3 mm. In this case the minimum unit depth needed will be 500 + 3 = 503 mm.
Yes, the bottom and the back of the Slim drawer have the same measurements for both the soft closing runners and the push runners.
The square rail section of the Slim drawer measures 23 mm by 13 mm and the section with trim measures 25 mm by 15 mm.
The RAL code of the anthracite grey finish of the sides of the Slim kitchen, household and bathroom drawer is approximately 7043.The RAL code of the white finish of the sides of the Slim kitchen, household and bathroom drawer is approximately 9003. Although it is necessary to bear in mind that the white silk colour of said drawer is metallized and the RAL codes are for flat colours.
The following video shows how you can easily assemble the Slim drawer.
Yes, the spacers that are user for assembling kitchen Vertex, Concept and Vantage drawers are the same as hinges on unit doors (hinged doors).
Ultrabox Drawer
The RAL code of the white finish of the sides of the Ultrabox kitchen drawer is approximately 9001.The RAL code of the aluminium finish of the sides of the Ultrabox kitchen drawer is approximately 9022.
The following video shows how you can easily assemble the Ultrabox drawer.


